SHIPMANX Documentation
Product Documentation

SHIPMANX
Complete User Guide

Action-First Logistics Platform for Shipping Teams — covering every feature, from Night Watch to Rate Database, with real screenshots from the live system.

100%
Shipment Visibility
0
Spreadsheets
6
Core Modules
$19
Per User/Mo
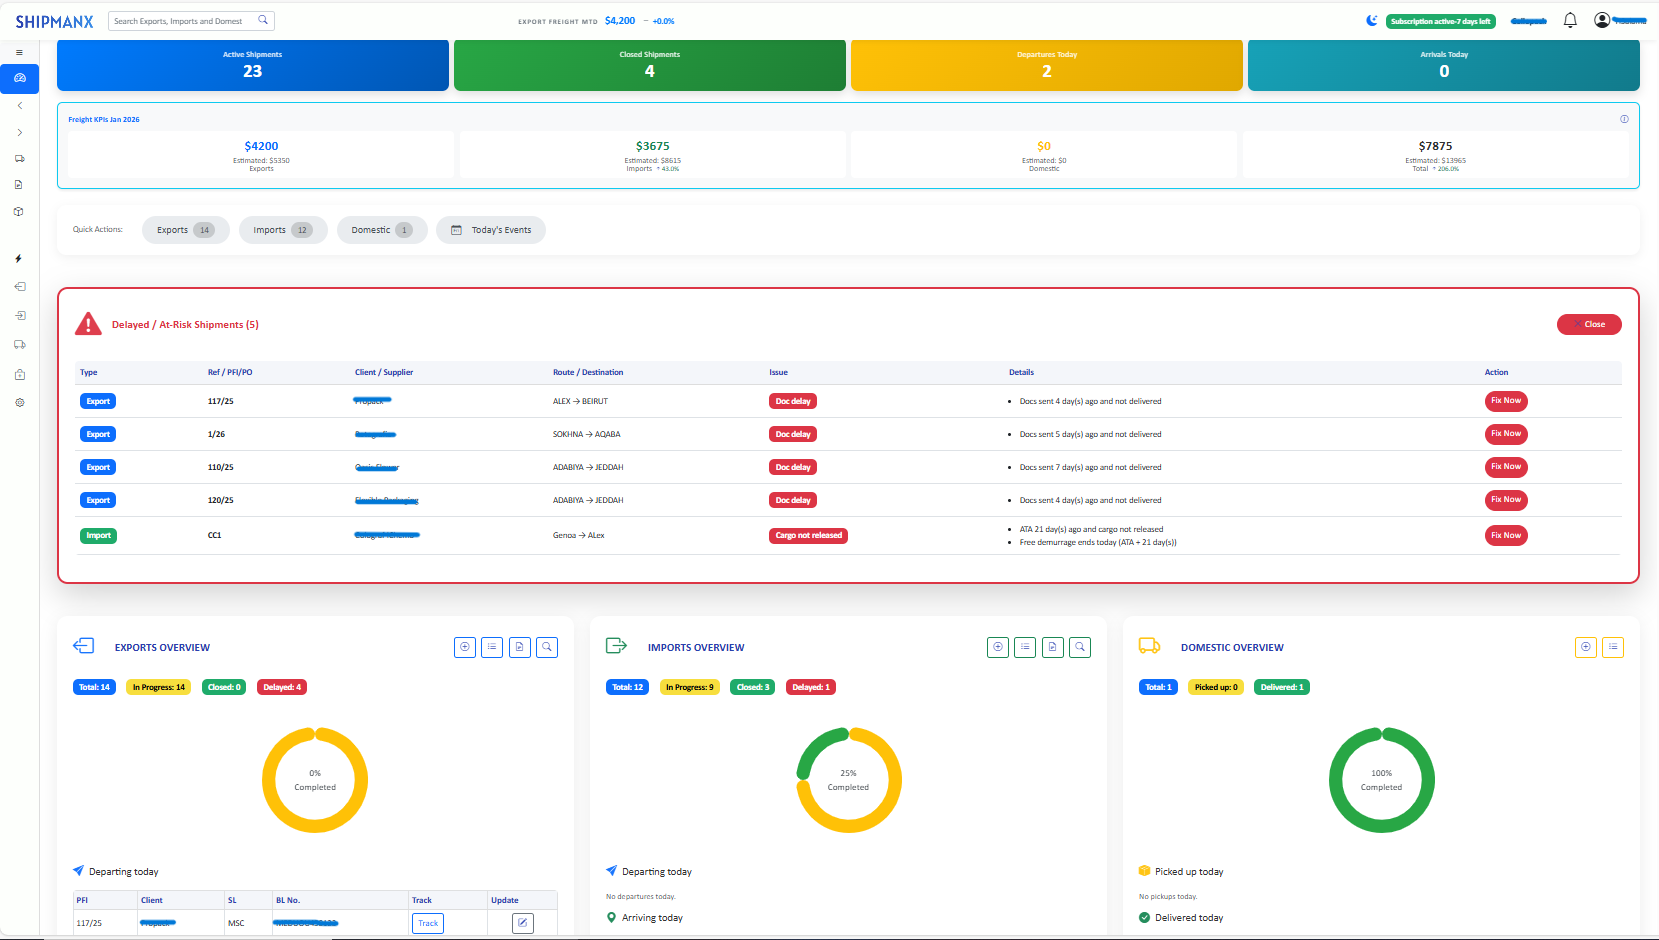
SHIPMANX live dashboard
Live Dashboard · Mar 2026
Step 1 — Log In
  1. Open the invitation email and click Activate Account. If you don't have an invite, ask your company Admin to add you from Settings → Company → Users.
  2. Set your password (minimum 8 characters). Your email address is your login identity.
  3. On the login screen, enter your email and password, then click Sign In.
  4. If MFA is enabled by your admin, you'll be prompted for a verification code from your authenticator app — enter the 6-digit code to proceed.
Step 2 — The App Layout

The main navigation is on the left sidebar. Click any section to expand it:

  • Dashboard — KPIs, active shipments summary, action items
  • Shipments — Browse/create Export, Import, Domestic, and Samples records
  • Documents — Manage CI, PL, BL, AWB, COO and quotation documents
  • Rates — Search rates and generate PDF quotations
  • Reports — Daily automated reports and saved exports
  • Action Center — Prioritized list of shipment issues and follow-up tasks
  • Intelligence — Carrier tracking, risk scoring, exception alerts
  • Settings — Company, users, notifications, document templates
Step 3 — Complete Company Setup

Before adding shipments, configure your company profile so all generated documents print correctly:

  1. Navigate to Settings → Company.
  2. Fill in: Company Name, Address, Phone, default Currency, and upload your Logo.
  3. Set your address blocks used in CI/PL headers.
  4. Click Save Changes.
Do This First
Set your timezone in Settings → General before anything else. All scheduled reports and Night Watch operate in your configured timezone. If you leave it at UTC, report delivery times will appear incorrect to your team.
Step 4 — Invite Your Team
  1. Go to Settings → Company → Users.
  2. Click Add Employee.
  3. Enter their Name and Email address.
  4. Select their Role: Admin (full control) or User (day-to-day access).
  5. Click Send Invite. They receive an email with an activation link and can log in immediately.

As Admin you can deactivate any user from the same screen to revoke access instantly.

Settings → Company
Field What to Fill In Used On
Company Name Your legal trading name CI, PL, all documents
Address Full street address, city, country CI header, PL header
Phone / Email Primary contact details Document footers
Default Currency Your billing currency (USD, EUR, etc.) Rate quotes, invoices
Logo PNG or JPG, min 200px wide CI header, reports
Address Blocks Multiple named address snippets CI/BL issuer field, PL shipper field
Settings → General
  • Timezone — Controls when daily reports are generated and when Night Watch evaluates each shipment. Set this before any other configuration.
  • Display preferences — Date format, number format.
  • Notification fallback email — Used when the primary email is unreachable.
Settings → Documents
  • CI Template — Choose layout (full-page or A4), set default incoterm, signature block.
  • PL Template — Commodity table format, number formatting.
  • Quotation Template — Add your company tagline, payment terms default.
  • Numbering format — Set prefix, starting number, and padding for each document type.
Creating a New Export Shipment
  1. Go to Shipments → Export and click New Export Shipment.
  2. Fill in: Shipper, Consignee, Loading Port, Destination Port, ETD, ETA.
  3. Add the Carrier, MBL and HBL numbers once received from the forwarder.
  4. Set the Goods Description, Gross Weight, and Measurement.
  5. Assign the shipment to a Rate from the database if a quotation has been issued.
  6. Click Save Shipment. The record appears in Shipments → Browse Export.
Updating Milestones

As the shipment progresses, update milestone fields from Shipments → Browse Export by clicking the shipment row:

  • ETD / ETA — Update when the schedule changes.
  • ATA (Actual Time of Arrival) — Set once cargo arrives at destination.
  • Gate-In / Loading / Departure — Update as containers move through the terminal.
  • BL Release / Delivery — Mark when documents are released or cargo is delivered.
Why Milestones Matter
Night Watch monitors milestone dates to flag overdue ETAs, late BL releases, and customs delays. Without milestone dates, the Action Center cannot identify at-risk shipments automatically.
Editing / Deleting

From Shipments → Browse Export, click any shipment row to open it in edit mode. Use the Delete Export Shipment button to remove archived records. You cannot delete a shipment that has attached documents — remove documents first.

Creating a New Import Shipment
  1. Go to Shipments → Import and click New Import Shipment.
  2. Enter Shipper, Consignee, Loading Port, Destination Port, ETA.
  3. Add Carrier, MBL, HBL, Container Number(s).
  4. Set Gross Weight, CBM, and cargo description.
  5. Click Save Shipment.
Key Import Milestones

Import shipments track a different milestone sequence than exports. Update these from the shipment edit screen:

  • ETA — Estimated arrival at destination port.
  • Arrival (ATA) — Vessel arrives at port.
  • Gate-In — Container cleared into terminal / CFS.
  • Documents Received — BL, CI, packing list received from forwarder.
  • Customs Clearance — Importer or customs broker clears the cargo.
  • Delivery / Do Collected — Delivery order collected, cargo out-gated.
Import Daily Report

The Reports → Import Daily Report generates a daily snapshot of all active import shipments sorted by ETA. Scheduled recipients receive this automatically each morning. Configure recipients at Settings → Notifications → Import Report Recipients.

ATA Tracking
If your carriers support it, enable Tracking Portal → Shipping Line API to pull vessel ETAs automatically. Manually entered ETAs are still required as a fallback and for Night Watch to work correctly.
Creating a Domestic Shipment
  1. Go to Shipments → Domestic and click New Domestic Shipment.
  2. Enter Shipper, Consignee, Origin, Destination, ETD, ETA.
  3. Add Carrier, AWB / Tracking Number.
  4. Fill in Gross Weight and cargo details.
  5. Click Save Shipment.

Domestic shipments do not use CI/BL documents — they rely on the AWB or carrier tracking number as the primary reference. Use the Document Workflow for quotation or delivery-note generation if needed.

Milestones

Domestic milestones: ETD → Departure → Arrival (ATA) → Delivery. Update from the shipment edit screen or from the browse table's inline edit.

Domestic Daily Report
Configure recipients at Settings → Notifications → Domestic Report Recipients. The daily domestic report is generated at your configured schedule and sent by email with a PDF attachment.
Creating a Samples Shipment
  1. Go to Shipments → Samples and click New Sample Shipment.
  2. Enter Shipper, Consignee, Origin, Destination, ETD.
  3. Add Carrier / Courier and tracking number.
  4. Set the Description of Samples and weight.
  5. Click Save.
Workflow

Samples shipments use a simplified lifecycle: Created → ETD Set → Dispatched → Delivered. There are no BL/CI documents for samples — the courier tracking number is the primary reference. Night Watch flags samples that have passed their ETD with no delivery confirmation.

Commercial Invoice (CI) & Packing List (PL)
  1. Open the shipment from Shipments → Browse Export (or Import).
  2. Scroll to the Documents section and click Generate CI / PL.
  3. The system populates shipper, consignee, goods, weight, and values from the shipment record.
  4. Review the generated CI — edit values inline before saving if needed.
  5. Click Save & Preview to view the print layout.
  6. Use Print Summary to open a print-ready view. From the browser print dialog, choose Save as PDF.
Document Upload (BL / AWB / COO)
  1. Go to Shipments → Browse Export and click the shipment row.
  2. Click Upload Document and select the file (PDF, JPG, PNG).
  3. Choose the Document Type (Bill of Lading, AWB, Certificate of Origin, etc.).
  4. Click Upload. The document appears in the shipment's document list.
  5. Attach the uploaded BL or AWB to the Shipment Document field so Night Watch can track its release date.
Document Revision Workflow

If a document needs correction after submission to the bank or customs:

  1. Go to Documents → Document Revision Upload.
  2. Select the Shipment and Document Type.
  3. Upload the revised file and add a revision note.
  4. Click Submit Revision. The revised version replaces the previous one with a revision log.
Smart Documents
SHIPMANX also supports an advanced Smart Documents module accessible from the Documents section — use it to create templated CI/PL/quotation documents with dynamic field mapping to shipment data for faster bulk generation.
Storing a New Rate
  1. Go to Rates → Export Rates and click New Export Rate.
  2. Enter the Carrier, Route (origin port → destination port), 20GP, 40GP, 40HC rates.
  3. Set the Validity Start and Validity End dates.
  4. Add Transit Time, Free Time, and any notes.
  5. Click Save Rate. The rate appears in Rates → Browse Export Rates.

Import rates follow the same process via Rates → Import Rates → New Import Rate.

Searching Rates
  1. Navigate to Rates → Browse Export Rates (or Import Rates).
  2. Use the search/filter fields to filter by Carrier, Origin, Destination.
  3. Results update in real time. Click any rate row to view full details.
Generating a PDF Quotation
  1. With a shipment open, click Rate Quotation from the shipment's action menu.
  2. The system pre-fills the route, cargo details, and selected rate from the database.
  3. Review and adjust the total landfall, validity, and payment terms.
  4. Click Generate PDF. A print-ready quotation opens in a new tab.
  5. Save as PDF or print directly from the browser.
Validity Tracking
Expired rates are marked with a visual indicator in the browse list. Night Watch does not automatically flag expired rates — check the Rates browse list periodically or schedule a monthly rate review. Set reminders in your calendar for each rate's validity end date.
Configuring Report Schedule
  1. Go to Settings → Notifications.
  2. Scroll to Daily Reports.
  3. For each mode (Export, Import, Domestic), set the Delivery Time — the clock time at which the report is generated and emailed.
  4. Choose the Format: PDF, Excel, or Both.
  5. Add recipient email addresses in the Recipients field — use commas to separate multiple addresses.
  6. Click Save Notifications.
  7. Use the Test button to send a sample report immediately and verify delivery.
UTC Caveat
The report schedule is interpreted in your configured timezone (Settings → General), but the underlying scheduler runs in UTC. If your timezone offset changes (e.g., daylight saving), reports may shift by ±1 hour until you update the schedule. Always use the Test button after a timezone change to confirm delivery time.
Saved Reports

All generated reports are stored and accessible from Reports → Saved Reports. You can download any historical report as PDF or Excel. Reports are retained for 90 days.

PDF Report Generation

The PDF daily report includes a formatted table of all active shipments for the selected mode, sorted by ETD/ETA. The Excel export includes all data columns for import into other tools. Both are generated server-side and attached to the email at send time.

How It Works
The Action Center is built by Night Watch each night. It scans every active shipment, applies configured flag rules, and surfaces the highest-priority items. Open it each morning as your first task — everything else on your to-do list follows from it.
Understanding the Action List
Column What It Shows
Ref Shipment reference number (MBL or internal ID)
Mode Export / Import / Domestic / Samples
Issue Flag type — e.g. Overdue ETA, Missing CI, BL Not Released
Days How many days the issue has been open
Recommended Action Next step to resolve the issue
Taking Action
  1. Open the Action Center from the sidebar (lightning bolt icon).
  2. Read the Recommended Action column for each item.
  3. Click the Ref to open the shipment record.
  4. Resolve the issue in the shipment record (e.g., upload BL, update ETA, generate CI).
  5. Return to the Action Center — the item drops off when Night Watch runs the following night. To dismiss manually, click the X next to the item.
Configuring Flag Rules

As an Admin, you can adjust flag thresholds in Settings → Action Center Configuration. Available flags include: overdue ETA threshold (days), missing document types, BL release delay threshold, and customs clearance SLA.

The SHIPMANX Overnight Cycle
During the day: Your team updates milestones, uploads documents, and creates shipments in SHIPMANX.
Night Watch runs (after midnight): Scans all active shipments, applies flag rules, builds the Action Center.
Before your configured time: Daily reports generated and emailed to recipients.
9 AM (or your set time): Team opens Action Center. Standup is 10 minutes because the list is already prioritized.
What Night Watch Flags
Flag Type Condition Severity
Overdue ETA ATA is past and Delivery milestone not set High
BL Not Released ETD has passed but no BL document is attached Medium
Missing CI Export shipment has Departed but no CI document Medium
Customs Delay Arrival milestone set but Customs Clearance not updated in X days High
Sample Undelivered ETD passed with no delivery confirmation Low
Rate Expiring Soon Assigned rate within 7 days of validity end Low
Enabling / Disabling

Night Watch is enabled by default for all companies on an active subscription. To pause it temporarily, contact support or disable from Settings → Notifications by pausing daily report generation. The Action Center still updates when shipments are manually saved even if Night Watch is paused.

Uploading a Freight Invoice
  1. Go to Freight Invoice Analysis (may appear under Reports or a dedicated menu item).
  2. Click Upload Invoice and select the file (PDF, XLSX, or CSV from your freight forwarder).
  3. For the system to match charges, at least one rate for the relevant shipment must exist in the Rate Database — upload rates for the shipment before uploading the invoice.
  4. The system parses the invoice and attempts to match each charge line to a stored rate.
  5. Review the results on the Invoice Analysis Results page.
Reading the Results
Column What It Shows
Charge Type Ocean Freight, THC, BAF, CAF, etc.
Quoted Amount Rate stored in SHIPMANX for this route/carrier
Invoiced Amount What the forwarder charged on the invoice
Difference Variance — positive = overcharged, negative = undercharged
Status Match / Mismatch / No Rate Found
Rate Reference Requirement
Invoice analysis only works if the shipment has at least one rate saved in Rates → Export/Import Rates. Without a stored rate, all lines show No Rate Found and no variance calculation is possible. Always store the confirmed booking rate before the cargo ships.
Main Tiles
Tile What It Shows
Active Shipments All in-progress shipments across all modes — live count
Closed Shipments Completed shipments within your configured visibility window
Departures Today Export and import shipments with ETD = today
Arrivals Today Import shipments with ETA or ATA = today
Freight KPI Panel

Below the KPI tiles, the Freight KPI panel shows month-to-date realized freight costs broken down by mode:

  • Export — Total invoiced ocean freight + local charges for export shipments this month
  • Import — Total charges for import shipments
  • Domestic — Domestic shipment costs
  • Total MTD — Sum across all modes
  • vs Prior Period — Percentage change vs last month (positive = cost increased)
Customizing the Dashboard

Admins can show/hide tiles and reorder them from Settings → Dashboard. Drag tiles to reorder, toggle visibility with the eye icon. Changes save automatically and apply to all users in the company.

Tab What You Configure
General Timezone, date/number format, notification fallback email. Set timezone first.
Company Company name, logo, address blocks, default currency for all documents
Documents CI/PL/quotation template layouts, incoterm defaults, numbering format
Dashboard Visible modules and tile arrangement order for all users
Notifications Daily report schedule, format (PDF/Excel/Both), recipient lists per mode
Custom Fields Company-specific additional fields that appear on shipment records
First Setup Tip
Set your timezone in General first — this ensures overnight reports arrive at the correct local time. Then configure Notifications → Daily Reports before adding your first shipments so your team receives the morning report from day one.
Adding a Team Member
  1. Go to Settings → Company → Users.
  2. Click Add Employee.
  3. Enter their Name and Email address.
  4. Set their Role: Admin (full access) or User (standard access).
  5. Click Send Invite. They receive an email with an activation link.
  6. They click the link, set their password, and can log in immediately.
Role Permissions
Role Can Do Cannot Do
Admin All of the below, plus: manage users, change settings, configure notifications, view billing
User Create/edit shipments, upload documents, generate reports, use rate database Add users, change company settings, access billing
Deactivating a User
  1. Go to Settings → Company → Users.
  2. Find the user row and click the Deactivate button (or the edit icon → Deactivate).
  3. The user's session is terminated immediately and they can no longer log in.
  4. All data they created remains intact.
Shared Live Data
All users in a company share the same live data — shipments, rates, and documents are visible to the entire team. Updates made by one user appear immediately for all others.
Symptom Likely Cause Resolution
Report emails not arriving Sender domain or recipient spam filter Check Settings → Notifications · verify inbox spam folder · use Test button
Night Watch not flagging expected items Threshold not yet met or shipment is closed Review shipment status and milestone dates · check Action Center Configuration
Scheduled report didn't run at expected time UTC timing mismatch in settings Verify timezone setting in Settings → General · use Test button to confirm
Document output looks wrong Template settings incomplete or required fields missing on shipment Check Settings → Documents · verify shipment fields are complete · use Print Preview
Shipment not appearing in Action Center Issue doesn't meet configured threshold Review flag condition thresholds in Action Center Configuration
Cannot upload a document Wrong file format or size over limit Use PDF, JPG, or PNG · max 10 MB per file
Rate not showing in quotation Rate expired or wrong mode (export vs import) Check rate validity dates in Rates → Browse · use Export Rate for export quotations
Invoice analysis shows "No Rate Found" No rate stored for this shipment's route/carrier Add the rate in Rates → Export/Import Rates before uploading the invoice
Email Support
help@shipmanx.com
Response within 1 business day
Website
shipmanx.com
Product updates · changelog · trial signup